For the users
Note
If you encounter an issue during installation, see our troubleshooting section. If that doesn’t resolve your issue, please create a bug report on our Github issue tracker.
Strict Requirements
MRSimulator has the following strict requirements:
See Package dependencies for a full list of requirements.
Make sure you have the required version of Python by typing the following in the terminal,
$ python --version
For MacOS users, Python version 3 is installed under the name python3. You may replace python for python3 in the above command and all subsequent Python statements.
For Windows users, Python is not usually installed by default. See Python.org for a list of official Python downloads and Windows installation instructions.
See also
If you do not have Python or have an older version of Python, you may visit the Python downloads or Anaconda websites and follow their instructions on installing Python.
Installing mrsimulator
Colaboratory is a Google research project. It is a Jupyter Notebook environment that runs entirely in the cloud. Launch a new notebook on Colab. We recommend going through the Welcome to Colab! tutorial if you are new to Notebooks.
To install the MRSimulator package, type
!pip install mrsimulator
in a new cell, execute, and finally restart the runtime. All done! You may now start using the library or proceed to Getting Started to continue the tutorial.
PIP is a package manager for Python packages and is included with Python version 3.4 and higher. PIP is the easiest way to install Python packages. Install the package using pip as follows,
$ pip install mrsimulator
For Mac users, if the above statement didn’t work, you are probably using MacOS system python, in which case, use the following,
$ python3 -m pip install mrsimulator --user
If you get a PermissionError, it usually means that you do not have the administrative access
to install new packages to your Python installation. In this case, you may consider adding the
--user option at the end of the statement to install the package into your home directory.
You can read more about how to do this in the
pip documentation.
Prerequisites
You will need a C-compiler suite and the development headers for the BLAS and FFTW libraries, along with development headers from Python and Numpy, to build the MRSimulator library from source. The MRSimulator package utilizes the BLAS and FFTW routines for numerical computation. To leverage the best performance, we recommend installing the BLAS and FFTW libraries which are optimized and tuned for your system. In the following, we list recommendations on installing the C-compiler (if applicable), BLAS, FFTW, and building the MRSimulator libraries.
Obtaining the Source Packages
The latest stable source package for MRSimulator is available on PyPI and Github release. Download and extract the .tar.gz file.
OS-dependent prerequisites
Note
Installing OS-dependent prerequisites is a one-time process. If upgrading to a newer version of mrsimulator, skip to the next section.
OpenBLAS and FFTW libraries
On Linux, the package manager for your distribution is usually the easiest route to ensure you have the prerequisites to building the MRSimulator library. To build from source, you will need the OpenBLAS and FFTW development headers for your Linux distribution. Type the following command in the terminal based on your Linux distribution.
For (Debian/Ubuntu):
$ sudo apt-get install libopenblas-dev libfftw3-dev
For (Fedora/RHEL):
$ sudo yum install openblas-devel fftw-devel
Install a C/C++ compiler
The C-compiler comes with your Linux distribution. No further action is required.
OpenBLAS/Accelerate and FFTW libraries
You will require the brew package manager to install the development headers for the
OpenBLAS (if applicable) and FFTW libraries. Read more on installing brew from
homebrew.
Step-1 Install the FFTW library using the homebrew formulae.
$ brew install fftw
Step-2 By default, the MRSimulator package links to the openblas library for BLAS operations. Mac users may opt to choose the in-build Apple’s Accelerate library. If you opt for Apple’s Accelerate library, skip to Step-3. If you wish to link the mrsimulator package to the OpenBLAS library, type the following in the terminal,
$ brew install openblas
Step-3 If you choose to link the MRSimulator package to the OpenBLAS library, skip to the next section.
(a) You will need to install the BLAS development header for Apple’s Accelerate library. The easiest way is to install the Xcode Command Line Tools. Note this is a one-time installation. If you have previously installed the Xcode Command Line Tools, you may skip this sub-step. Type the following in the terminal,
$ xcode-select --install
(b) The next step is to let the MRSimulator setup know your preference.
Open the settings.py file, located at the root level of the MRSimulator source
code folder, in a text editor. You should see
# -*- coding: utf-8 -*-
# BLAS library
use_openblas = True
# mac-os only
use_accelerate = False
To link the MRSimulator package to Apple’s Accelerate library, change the fields to
# -*- coding: utf-8 -*-
# BLAS library
use_openblas = False
# mac-os only
use_accelerate = True
Install a C/C++ compiler
The C-compiler installs with the Xcode Command Line Tools. No further action is required.
Install conda
Skip this step if you already have miniconda or Anaconda for python >= 3.10 installed on your system. Download the latest version of conda on your operating system from either miniconda or Anaconda websites. Make sure you download conda for Python 3. Double-click the downloaded .exe file and follow the installation steps.
OpenBLAS and FFTW libraries
Launch the Anaconda prompt (it should be located under the start menu). Within the
anaconda prompt, type the following to install the package dependencies.
$ conda install -c conda-forge openblas fftw
Install a C/C++ compiler
Because the core of the MRSimulator package is written in C, you will require a C-compiler to build and install the package. Download and install the Microsoft Visual C++ compiler from Build Tools for Visual Studio.
Building and Installing
Use the terminal/Prompt to navigate into the directory containing the package (usually, the folder is named mrsimulator),
$ cd mrsimulator
From within the source code folder, type the following in the terminal to install the library.
$ pip install .
If you get an error that you don’t have the permission to install the package into
the default site-packages directory, you may try installing with the --user
options as,
$ pip install . --user
Updating mrsimulator
If you are upgrading to a newer version of mrsimulator, you should have all the prerequisites already installed on your system. In this case, type the following in the terminal/Prompt
$ pip install mrsimulator -U
All done! You may now start using the library or proceed to Getting Started to continue the tutorial.
Testing your build
Note
For Windows users using Anaconda Python 3.9 and higher, you need to set the following
environment variable in the Anaconda Prompt before running mrsimulator scripts.
$ set CONDA_DLL_SEARCH_MODIFICATION_ENABLE='1'
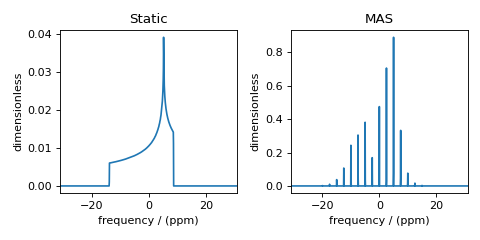
If the installation is successful, you should be able to run the following test file in your terminal. Download the test file here or copy and paste the following code into a Python file and run the code.
from mrsimulator import Simulator, SpinSystem, Site
from mrsimulator.method.lib import BlochDecaySpectrum
import matplotlib.pyplot as plt

# Make Site and SpinSystem objects
H_site = Site(isotope="1H", shielding_symmetric={"zeta": 13.89, "eta": 0.25})
spin_system = SpinSystem(sites=[H_site])

# Make static and MAS one-pulse acquire Method objects
static = BlochDecaySpectrum(channels=["1H"])
mas = BlochDecaySpectrum(channels=["1H"], rotor_frequency=1000)  # in Hz

# Setup and run the Simulation object
sim = Simulator(spin_systems=[spin_system], methods=[static, mas])
sim.run()

# Plot the spectra
fig, ax = plt.subplots(1, 2, figsize=(6, 3), subplot_kw={"projection": "csdm"})
ax[0].plot(sim.methods[0].simulation.real)
ax[0].set_title("Static")
ax[1].plot(sim.methods[1].simulation.real)
ax[1].set_title("MAS")
plt.tight_layout()
plt.show()

Figure 3 Simulation of static and MAS solid-state NMR spectra
Note
If you encounter the following error
ValueError: numpy.ndarray size changed, may indicate binary incompatibility.
Expected 88 from C header, got 80 from PyObject
update numpy by running
$ pip install -U numpy